

Preamble
This article was originally meant to just be a session report, no more. However, recently there have been a few threads on Boardgamegeek (hereafter BGG) from new owners who are looking for a playbook or equivalent support material for this game. Empire of the Sun (2005) is now in its 5th printing (thank you everyone) and a new crew wanted some help motivating me to do a little research. The game’s BGG game page lists 148 videos and 176 strategy threads, some written by me. Further research into my C3i collection shows that I and others have written over a dozen lengthy strategy articles since 2005, many freely available on their website. That said, I decided to expand this article’s purpose from a standard session report into a strategy dialog, so hopefully this will help some of the new Empire of the Sun (hereafter EotS) owners get some insight on how to improve their play. Please note two important points for beginners, follow the sequence of play (no shortcuts) and consult Erasmus (the ‘bot) for strategy advice.
Introduction
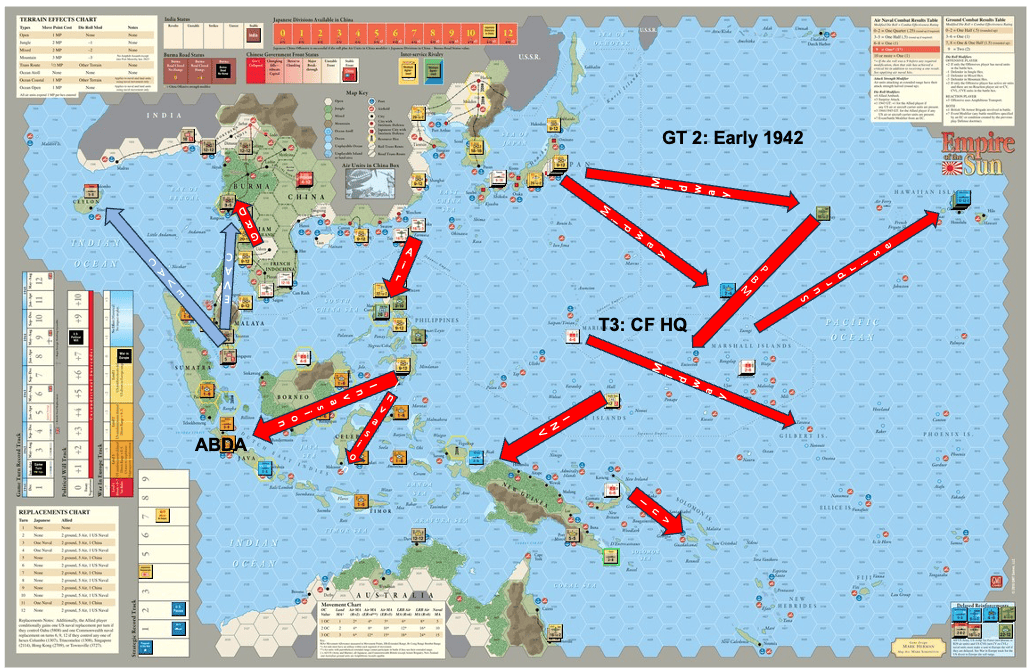
During the end of September’s weekend nor’easter storm in New York, I decided to not work and instead play Empire of the Sun. In fact I played three games on Saturday (September 26th) and per my usual manner I played the 1942 scenario, and after three turns (1942 scenario end) I evaluated the score and the map situation. If it’s a tactical victory for either side, I look at the map situation and if it looks interesting I continue and if not I reset and begin again. If it’s a decisive Allied victory, which one of these three playthroughs was, I restart and if it’s a Japanese decisive victory, nine times out of ten I finish the game. What follows is Saturday’s second session where I experimented with an old variant on the standard Tsushima opening (featured in C3i#17 2005) that focuses on gaining a war winning edge for the Japanese in the Central Pacific while using a very challenging Japanese opening hand of cards.
To begin, one of the ways the Japanese ‘win’ the game is if they can force a negotiated settlement to the Pacific War by reducing at the end of a turn US political will to zero. Note, a negotiated settlement is broadly defined by me that the Allies fall off, in any way, from their Potsdam and earlier declarations for unconditional surrender. A negotiated settlement is not US surrender, but a recognition that the cost for this policy is sufficiently high enough that some concessions are made to end the conflict. It is clear that Truman after seeing the casualty lists from Okinawa was looking for an invasion off ramp that the Manhattan project supplied. If you squint at it, technically there was an unwritten negotiated settlement that promised not to hang Hirohito who then intervened with the military to force surrender. In Empire of the Sun this Japanese negotiated pyrrhic victory aligns with their original strategy for going to war and what winning meant to them.
The major mechanisms for reducing US political will are Japanese offensive success (e.g., Dutch East Indies, Malaya, Philippines, Burma), Allied nation surrender (e.g., China, Australia, India), two card events, losses of US territory (e.g., any Hawaiian island, Alaska), and excessive land or naval losses.
Most Japanese wins are achieved by the Allies failing to invade and occupy all of Honshu by the last game turn. Again my thinking on such a stringent occupation requirement is that the actual invasion of Japan would have generated massive casualties running in excess of a million likely millions. Again my idea is that some Allied concessions may have been made to end the conflict short of Armageddon. This end game has its own interesting skill challenges, but if the Allies get ashore in Honshu on or before the penultimate game turn, a Japanese resignation is a prudent way to begin happy hour a bit early.
Impact of Cards on Strategy
Military events in Empire of the Sun represent logistics (activations and battle hexes) accompanied by senior level guidance (Tojo and the Imperial Staff or FDR/Churchill and the Combined Chiefs of Staff). If you follow senior guidance you get to use the card for its maximum benefit. If you use the card in contravention to guidance, consider that you got a waiver (changes to conference strategy occurred often), but with some loss of planning/logistic efficiency. Non-military events constitute opportunities that you leverage for additional resources or circumstances that may or may not benefit your operations.
I have written many strategy articles for C3i starting with #17, written just prior to Empire of the Sun (hereafter EotS) reaching the market in 2005. As I started writing this article, I became curious and ended up spending hours going through all my C3i EotS articles to see how my strategic thinking on this design has evolved since its publication. My article in C3i #21discusses how the Japanese need to consider shifting one of their HQs into a more forward position to enable a broader offensive threat. Typically the Japanese have to consider such a redeployment early in the game and for the Allies this usually occurs late in the game when Honshu is in their sights. As a teaser here is one of the new cards from the upcoming EotS China expansion.
As I have written and stated in multiple EotS videos, the Japanese in the opening have to balance three major variables: battle hexes, activations, and amphibious shipping points (hereafter ASP). Playing a card for its operations value only allows the offensive player to create a single battle hex, although note the reaction player can create additional battle hexes due to a special reaction. A military event allows the offensive player to create a number of battle hexes equal to or less than the number of units activated. What challenges new players is the fact that having only one military event limits the number of battle hexes. Said another way, if you have only one military event, the other six cards, if used for operations, can only generate a maximum of six battle hexes. This does not limit a unit from moving to an unoccupied hex as that does not create a battle hex per se, so the challenge is understanding how many opposed objectives you can attack with a hand.
The activations variable is how many units can be activated across a turn. The total activations is impacted by which HQ’s efficiency rating is used for a given card play, but broadly the maximum activations for a hand of cards are the total value of the military event logistic values plus the total OC value of the non-military event cards plus 1 per card for HQ efficiency (can be 2 or 3 but normally is a minimum of 1). This is the equation that Erasmus ‘bot uses to evaluate the activation potential for a hand of cards.
The last variable is the number of ASPs available. At the beginning of the 1942 start Japan has 7 and the Allies have 1 ASP available. If the JP are put under interservice rivalry it is reduced to 4. This means that the only card play that the JP can be assured of 7 ASPs available is their first card play. It should be noted that there are a few cards that give temporary ASPs and one Allied card that increases total Allied ASPs plus a number of Allied cards that permanently reduce Japanese ASPs (e.g., Skip Bombing).
When you look at any hand of cards, look at it through the lens on which variable is the long pole in the tent. Meaning, which of these three variables is going to limit your operations. For example, in an opening turn, the Japanese play their first card, then the Allies play an ISR card, now limiting the JP to a total of 4 ASPs for the remainder of the turn (minus any used on the first JP card play). In this instance ASPs would be a limiting variable on operations. It is wise for the JP not to use more than a couple of ASPs on their first card play as a hedge against such an occurrence. With this as preamble, let’s continue to the session report.
Midway Gambit
In C3i #21 (circa 2008), my article on Japanese opening strategy began with a short discussion around aggressive offensives redeploying an HQ forward to expand their logistic footprint. This is true for both sides, specifically the Japanese early in the war and the Allies late in the war. As I wrote in this article the Japanese are assured to get at least one military event in their opening hand and if that is not the case they can swap out their highest operational valued card for Kondo (Military Event card #47).
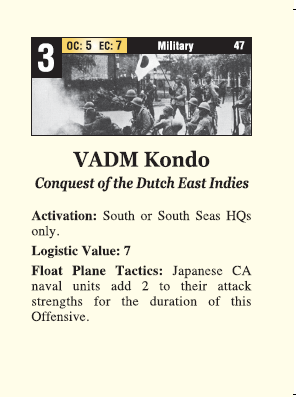
As a learning tool for beginners I created an option whereby the Japanese receive 3 strong military events plus 4 random cards in their opening 1942 hand while the Allies get Arcadia Conference with an option to play it immediately. The most difficult hands for Japan are when they get a single military event that has significant activation restrictions such as the Op MI: Battle of Midway event. As you can see from the card image (illustration 3), the main restriction is all battle hexes must be fought in one hex islands of which the Philippines and most of the Dutch East Indies are not, so even a Dutch Regiment on Borneo prevents using an Op MI activation to attack Tarakan or Balikpapan. The major positive is Op MI has the largest logistic value of any card in the Japanese deck with no HQ restrictions. The event also features an interesting intelligence die roll modifier if the US has shifted the reduced strength Cruiser unit in Oahu to another location, such as Dutch Harbor.
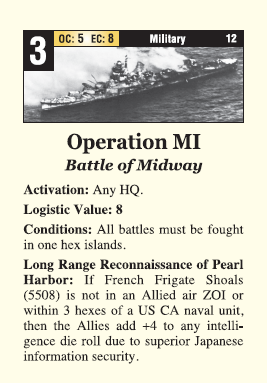
After a continuous series of sessions conducted over two decades I find difficult hands the most fun to play. Getting Op MI as my only military event is one of my favorites to execute. What follows is a solitaire session report where I played the Japanese and I used the Allied Erasmus ‘bot as an opponent. For each turn I will show the cards drawn, but except for the first turn, the narrative will be a summary of significant operations and their results.
Spoiler Alert (don’t read this sentence): If you skip ahead you will see that this scenario leads to a Japanese turn 7 negotiated settlement victory.
Jan-April 1942 (T2)
Cards: I use abbreviations for the cards, but you can easily look at the analog cards if you want more details than provided in the narrative.
| Japanese | Allies |
| Op MI | Arcadia (scenario option taken) |
| Gandhi Workers Strike | Darter-Dace Sub |
| Hurley | Lilliput |
| WiE minor | Op Tarzan |
| JN25 May 28 | Reno II |
| Chang Kai Shek | Pass |
| JN 25 | Pass |
The Japanese hand is a 7 card random draw. As you can see the only military event card (hereafter EC) is Op MI and a collection of events that collectively have three 3 value operational cards (hereafter OC), two 2 OC, and one 1OC. Amongst the non-EC options one could consider getting aggressive in China (Hurley and Chang) with a valuable War in Europe (hereafter WiE) to counter an Allied WiE card if played (Allies are not holding one), but I’ll still hold it till late in the turn. So here is how things played out in the first turn.
Strategy: Japanese need to capture 13 of the 14 resource hexes by the end of 1942 (three turns). Failure to do so will likely lead to a 1942 scenario defeat and in a campaign having less than 7 cards (one card per two resource hexes, round up) in 1943-45 prior to Strategic warfare (submarines and ultimately B29s).
The narrative for this session has Yamamoto and the Combined Fleet gaining more than their historical sway over the Southern Resource offensive. My plan is to neutralize the DEI ports by putting an air zone of influence (hereafter AZOI) over those locations plus block the Celebes/Borneo strait to prevent Allied reinforcements deploying into the DEI next turn. The most efficient way to neutralize the DEI is to capture two locations of which only one of them is an opposed landing while also closing the Borneo/Celebes strait with AZOI. As this strategy only requires one battle hex you only use two cards for their OC value to neutralize the DEI.
The weakness of this hand is it is impossible to gain full air superiority on the first card as this hand cannot generate more than one battle hex per round outside of the Midway event. My priority is always to shut down the Philippines which requires just two activations (many combinations) for an automatic success.
The main focus of the Midway gambit is to capture Midway, Tarawa, and Wake, then shift the CF HQ forward next turn into Eniwetok to contest the US from retaking Midway and defend the Marshall Islands. Following the original Midway script, it is also intended that both US carrier units be eliminated, but that is always an uncertainty.
Key: Unit names are those on the counter and a (unit) name surrounded by parenthesis is a reduced unit. To make the narrative easier to read, I do not specify where each unit originates from and the path it takes, so if that is something you want to understand, just load up the amazing EotS Vassal set created by Franciso Colmenares.
A1 (Allied 1 card): Arcadia, ABDA HQ placed in Tjilatjap
As I stated earlier I always play with the scenario option whereby the Arcadia event is played immediately after the Allied Emergency Naval move.
J1 (Japanese 1 card): 1 OC (JN25) to activate Combined Fleet HQ (hereafter CFHQ) for 4 activations. I activate two air units (5 AD and 23 AF) plus the 2nd Special Naval Landing Force (hereafter SN) and reduced (17) army. I move the 23 AF to Clarke airbase and declare Manila as the single battle hex attacked by the 5 AD and 23 AF; this will lead to an automatic elimination of the US (FEAF) air unit. The (17) army moves to Davao (port to port, 8.44) and the 2nd SN moves amphibiously to Jolo for the use of 1 amphibious shipping point (hereafter ASP). Jolo is an important port/airbase to control as it allows the JP to shift land based air units into forward captured airbases.
As a tactical note, using a 1 OC card instead of a 2 OC card prevents the Allied (SL) Corps from reinforcing Bataan (requires 2 movement points). As a second tactical note, dice luck plays a role in EotS only when circumstances or your decisions make it so. The worst result you can get from air/naval combat is a .25 (quarter strength) result, so if you attack a 10 defense unit with 40 factors, you cannot fail, attack with less and you will often experience the fact that “the dice love no one.”
A2: Reno II: ABDA for 5 activations that sends the Australian division to Columbo Ceylon. I also evacuated the US DD naval unit to Darwin Australia as every Allied naval unit has great value in the early war turns. The Dutch CL redeployed into Soerbaja Java.
J2: Op MI: CFHQ for 11 activations with the objectives of Midway, Tarawa, and Wake. This operation used 4 ASP (5 used out of 7 so far). As an aside, if the Allies were to place the JP under ISR (they currently do not have the card), the JP could not conduct any further amphibious attacks without organic/barge transport (rule 8.46 and 8.47). Midway and Tarawa are captured. Wake unexpectedly survives repulsing the reduced (18) army that lost its bombardment support due to Darter-Dace and a zero combat roll. If the (BB Yamato) had survived, Wake would have been captured.
A3R (R=reaction): Darter-Dace submarine, sinks (BB Yamato) draws Op Squarepeg.
A4: Pass
J3: 3 OC Gandhi, CF HQ 6 activations, Tjilatjap battle hex. When you have a shortage of available battle hexes, subtlety is a luxury you cannot afford. Over the course of the first two card plays I increased the number of ground steps in Davao to 3 reduced armies. This force of 2x CVLs, a CA, and 3 ground steps captures Tjilatjap, knocks out the ABDA HQ and neutralizes all of the Java ports plus Teleokbetong Sumatra.
A5: Pass, last Allied pass
J4: 3 OC Hurley, South Seas HQ (hereafter SoSa HQ) for 5 activations, JP carriers from Eniwetok successfully surprise attack Pearl Harbor (Allies fail their intelligence reaction) sinking both US Carriers (Enterprise and Lexington). Unless the Allies have the Heroic Repair card, which they do not, the US at the end of the turn will lose one US political will point. This was a big moment in the game and the basis of the Tsushima opening.
The combination of Op MI and a second strike on Pearl Harbor created carrier battles around Midway and Oahu. The outcome of these battles was the elimination of the US Enterprise and Lexington carriers, but the JP lost three steps of carriers and the BB Yamato, there was no free lunch here. Carrier combat in 1942 is typically bloody and can swing from one side only getting banged up or both sides suffering significant losses as was the case here. Even with the second attack on Pearl Harbor being a surprise, the JP still took losses due to a critical hit. Luck went both ways in this situation.
A6: Squarepeg played into the Future Offensive Queue (FOQ)
J5: 2 OC Chiang Kai Shek, South HQ for 3 activations saw a CA + 2nd SN out of Jolo capture Makassar Celebes with the 23rd AF in Post Battle Movement (hereafter PBM) to that location placing its AZOI over Kendari Celebes, Timor and the Borneo/Celebes strait effectively neutralizing all DEI ports from receiving reinforcements next turn.
A7: 2 OC Tarzan, Malaya HQ, This move sacrifices Malaya in exchange for making Burma a much harder nut to crack. In a version of the cancelled Matador offensive the Indian 3rd Corps recaptures Singora and the MA(laya) air uses the now reestablished air bridge to fly to Rangoon. Singapore is now wide open for conquest.
J6: 2 OC May 28 JN25 reaction event, CF HQ is voluntarily withdrawn.
A8 1 OC Lilliput, SW Pac HQ is voluntarily withdrawn.
J7: 3 OC, WiE minor, SoSa HQ for 5 activations captures Guadalcanal (unopposed) and Biak (opposed).
National Surrender Phase: Australian Mandates convert to JP and the Allies lose one US political will for the loss of the carriers (PW 8 to 7). Note that one of the downsides of exercising the ABDA event option to play it immediately meant the Allies had 8 card plays, but the JP still went last.

Long Strategy Note: Why capture Wake and Tarawa? Historically the Japanese captured Wake and Tarawa for the same reasons you would do it in Empire of the Sun, to cut the US land based air route into the Central Pacific and defend the flanks of their Marshall Island possessions.
Since the game’s release I have been asked this question many times and that question is often connected to a discussion around some early 2005 attempts at the Japanese Sleeping Turtle defense. As these two strategy concepts intersect around Wake and Tarawa let me first discuss the defense of the Marshall Islands. If the Japanese do not capture Wake, Tarawa, or both they leave a huge hole in their Central Pacific defenses.
1. Wake: You can fly a Long Range Bomber (hereafter LRB) from Oahu to Midway then Wake then onto Marcus, Eniwetok, or any of the Marshall Islands. If the Allies hold Wake they can place via reinforcement a land based Short Range (hereafter SR) air unit into Wake which can now reach Eniwetok, Kwajalein, or Wotjie. Obviously if an air unit can fly somewhere they can attack from that location also. In a nutshell, Wake guards the northern route to the Marshall Islands plus an LRB on Marcus can attack Tokyo, Iwo Jima, Saipan, Guam, and Eniwetok. Clearly, Allied control of Marcus is to be avoided.
2. Tarawa: This atoll was amphibiously attacked in November 1943 and was a harbinger of the amphibious conflict that followed. An Allied air unit on Tarawa projects its AZOI over Jaluit and Mili, enabling easy invasions by unescorted ground units. One of my favorite tactics when I am the Allies is to use my one ASP to move the Marine Wake Brigade to Tarawa then place an SR air unit there during the next reinforcement phase.
3. The Midway Gambit’s strategy is to fight and hold the Central Pacific from early US offensives, so these two locations are critical elements for that strategy.
Sleeping Turtle Opening (Japanese do not take Wake or Tarawa or Guadalcanal or New Guinea)
Historically a considered path not taken by the Japanese was to limit their expansion to the Southern Resources and absolutely critical locations to shorten their defense perimeter. An illustration of this reluctance was the Army and Imperial Staff’s opposition to capturing Midway, especially as a prelude to invading Oahu. Since Empire of the Sun’s release many players have tried to use a similar concept to manipulate the Allies Progress of the War (hereafter PoW) mechanic by limiting potential targets. The tactic relies on heavily defending a limited number of island hexes when the Allies are short on ASPs. If the Allies comply and attempt to take this strategy head on they risk missing their PoW goals once or twice in 1942-43. That’s the Sleeping Turtle’s theory for success.
In actual tournament play this strategy does not work unless it’s your first time seeing it and you do not know what to do. The problem with the Sleeping Turtle is it yields the initiative to the Allies and perimeter defenses have never worked historically or in Empire of the Sun. Each time I’ve seen someone in a competitive game use the Sleeping Turtle it fails for the same reason, you cannot defend a long perimeter against small, short range offensives. Once the Allies have sufficient forces and ASPs, it is easy to take head on. So, here are the basics.
1. The Japanese do not expand into New Guinea (except sometimes Vogelkop), the Solomons, Wake, Tarawa or Burma (except sometimes Rangoon). Regardless, the Allies will only suffer three US political will reductions for the DEI, Malaya, and the Philippines. Then each of the key island ports are defended with one preferably two step army units with a mobile naval reaction force based somewhere in the Central Pacific, such as Saipan. The DEI ports are also defended, but ultimately there are too many locations to defend along a southern perimeter that spans most of the map’s width.
2. In response the Allies should take advantage of all of their now unconquered ports and airbases to place their reinforcements far forward with the ANZAC, South Pac, and SW Pac HQs occupying Darwin, Biak and if possible Timor. Note that within 10 hexes of Darwin there are over a dozen DEI hexes that the Japanese have to defend. The Japanese do not have enough units to defend the Central Pacific and the DEI axes of advance in depth. Since the Japanese have yielded the initiative the Allies have the luxury of being deliberate in how they position their forces before they strike.
3. The Sleeping Turtle tries to use mobile naval forces to react to Allied attacks along their perimeter. The key Allied tactic is the use of 1 OC offensives into locations that are too far from centrally positioned naval reaction forces. No matter where you put those Japanese forces they are going to be too far from some forward Allied force concentration. Another nasty trick is that some islands such as Kusaie are outside of AZOI unless there is a unit defending the island. As I said, no way to defend the entire perimeter against short range attacks, especially if the Allies can ‘smother’ the Japanese reaction naval forces from an LRB on an Allied controlled Marcus island.
4. My key tactic is to initiate ground operations on a large island in the DEI. I use one ASP to capture an undefended or lightly defended port on Borneo, Java, or my favorite Teleokbetong Sumatra with US Army or Commonwealth forces. An especially useful unit is the New Zealand division that is featured on two surprise attack events. Remember a failed Commonwealth invasion has no impact on US political will.
5. If the Japanese heavily defend the DEI locations, then Allied control of Wake and Tarawa will create offensive opportunities in the Marshall Islands. In this situation I use my position on Tarawa to slowly knock off hexes in the Marshall Islands. Usually it’s a combination of these routes, but the important point is do not focus on opposed amphibious assaults with three ASP except to get a port on a large DEI island then flow in US/Australian Corps. When more ASPs are available, recapture Rabaul with Infantry Corps.
6. You may fail PoW once in this process, but since Burma is not being attacked you have a US PW to spare. Once you establish US/Australian Corps on a large island, just advance. For example with SW Pac you are in range of Teleokbetong which I have taken with a Marine brigade, then flow in US Army Corps and capture the two Southern Resource hexes. Southern Sumatra allows the Allies to both meet PoW and reduces the Japanese cards by one per turn for the remainder of the game.
7. A major weakness of the Sleeping Turtle is the loss of Singapore allows the Allies to shift all of their CBI Corps into Malaya and an advance into French Indochina and beyond to the China coast. For the record I have never seen the Sleeping Turtle work in tournament play, but you do need to understand how to defeat it.
Now back to the Midway Gambit.
May-August 1942 (T3)
Reinforcements and Replacements are taken, SW Pac is placed in Darwin and CF HQ is placed in Eniwetok.
Strategic Warfare: Allied submarines miss; JP receives 7 cards.
Strategy: Broadly the Japanese need to finish their Southern Resource offensive while initiating an attack into the China-Burma-India (hereafter CBI) theater. The objectives are to force the surrender of the DEI, Malaya, and the Philippines. An important secondary objective is the capture of Rangoon. As it turns out the Kondo and Adachi military events combination is very powerful. Tactically you use Kondo to capture a number of resource hexes amphibiously, while using follow on ground attacks with Adachi to set up the capture of inland objectives such as Manila, Singapore, Palembang and Rangoon.
In support of these offensives it would be a good idea for the Japanese to play the War in Europe (hereafter WiE) major event to ensure the continued delay of Allied reinforcements. This hand features three reaction cards (Savo, submarine attack, and JN25) and it is likely that the JP will see at least one new card draw if not two or three this turn.
Cards
| Japanese | Allies |
| No FOQ | Squarepeg FOQ |
| Kondo | Army Codebreak |
| Sub c24 | ISR |
| WiE major | Matador |
| JN25 | WiE Minor |
| Savo | Op Vengeance |
| Adachi | Quadrant |
| WiE Minor | Pass |
Combined Fleet HQ to Eniwetok
The continuing Southern Resource Offensive used a combination of Kondo and Adachi to capture the remaining 6 resource hexes in the DEI plus Manila and Singapore. However, the JP attack into Burma ran afoul of the Allied Army Codebreak reaction event and the 15th army was initially repulsed and had to use another set of activations to capture the northern end of the rail line adjacent to Rangoon that the community calls Kwai North.
The CBI saw the Allies holding a number of useful events that first repulsed the initial JP foray into Burma. However the play of the Savo counteroffensive card stopped the Allies from retaking Midway and then drew the Tsuji surprise attack card. The subsequent Tsuji offensive ran afoul of the Matador reaction card that eliminated the JP 15th army although Rangoon still fell.
Allied counter moves: The Allies placed the JP under ISR and drew Flintlock. As already mentioned the Allies eliminated the 15th army with Matador. The Allies used Op Vengeance to kill Yamamoto followed by amphibious assault (hereafter AA) on Midway, which were repulsed by the use of the Savo counteroffensive card. The loss of Yamamoto did not materially impact the strategy.
Bottom line: Both sides played aggressively with the JP forcing the surrender of the DEI, Philippines, and Malaya plus capturing Rangoon to close the Burma road. The occupation of Midway with the surrenders reduced US political will from 7 to 3. In the broader war there were a series of changes in the status of the War in Europe that settled in the -3 box by the end of the turn.
By the end of turn 3 (August 1942) the Japanese historically reached their expansion apogee. If this is not the case in your session, the Japanese are behind schedule. The Japanese deck is designed to generate 2.5 military events per turn or 4-5 military events by the end of turn 3. In this session I achieved the historical schedule with 4 military events, two of which had significant restrictions, and as seen met the historical standard.
Flipping the script to the Allies, early aggressive play is a required skill. I have seen some reviews and commentary that the Allies are boring to play in the first couple of turns as they have nothing much to do. My view is Allied strategy in the opening is asymmetrical and less obvious to understand without some playtime under your belt.
I used Erasmus as a foil for this session but remember the comment in the Card Driven Solitaire System (CDSS) Introduction that states, “…if you find yourself in a situation where the flowcharts fail to make a logical choice appropriate to the situation, simply apply common sense.” In this session, the flowcharts worked perfectly, but due to the early loss of Midway on turn 2, late in turn 3, I activated the ‘bots turn 4 offensive priorities early as to do otherwise was illogical (beam me up Scotty).
What transpired was the Erasmus solo ‘bot managed to eliminate the Japanese 15th army in Burma (reaction), killed Yamamoto (event), placed the Japanese under ISR (event), then almost succeeded in recapturing Midway. The Allied Midway offensive was repulsed by the play of the Savo counteroffensive that luckily was in the JP hand. Note that the Erasmus ‘bot has an entire Reaction panel of instructions that are quite sophisticated and will use Ambush/ Intercept events to activate units that meet a given situation plus make punishing counterattack decisions.
My advice is when playing the Allies be aggressive as long as it doesn’t risk losing US political will. If you are unclear on what to do, always feel free to consult Erasmus. You don’t have to do what it would do, but it may give you some ideas on how to proceed in a tricky situation. The Allies should be eager to take air losses, even disproportionate ones, as yours will be replaced while the Japanese only become weaker. If you lose a critical location such as Midway, try and take it back and at the first opportunity recapture a forward port that you can use for launching future offensives (Guadalcanal, Northern New Guinea, or Timor).
Sep-Dec 1942 (T4)
Cards
| Japanese | Allies |
| JN25 FoQ | WiE Minor FoQ |
| Central Agreement | Anakim |
| Op RI | Sextant |
| East Force | Rochefort |
| Big Tokyo Express | WiE Minor |
| Ugaki | King II |
| WiE Minor | CV Raids |
| Ha Go | LeMay |
Reinforcements and Replacements enter play while Strategic Warfare failed (submarines missed). The Allies used their reinforcements to build up a significant force in Darwin Australia. Both sides drew 7 cards, and each side has one card in the FOQ. An important JP AZOI (from Biak) is in place over Hollandia and the Vogelkop New Guinea which will become an important advantage early in this turn. Remember, reinforcement placement is part of offensive strategy.
Strategy: Turn 4, end of 1942, is the transition game turn in the campaign. At this point the Allies need to begin moving forward as they now have Progress of the War (hereafter PoW) goals each turn going forward. The Erasmus ‘bot at this time shifts into its Midgame Phase, although sometimes, as I did in this playthrough, I shifted into the Allied Midgame strategy a bit early due to the loss of Midway. As noted the Japanese start the turn under ISR which significantly restricts their ability to make useful amphibious reactions as you cannot use navy with army ground units. That said, the Japanese are holding a Central Agreement card that will end ISR.
The Japanese objectives are to finish consolidating a defense perimeter by strengthening their position in Western New Guinea, capture the Vogelkop resource hex, shift stronger ground units into key island positions to oppose the inevitable Allied advance while establishing reaction forces. As a broad comment, it is difficult to prevent the Allies from achieving PoW, but the best opportunity usually falls in this turn when the Allies have 3 ASPs and not many overland objectives. A very useful card on turn 4 is the Booz Resource event. Usually one failed invasion is enough to prevent PoW on this turn. Beyond turn 5 it should be very rare for skilled Allied play to fail PoW. As stated, the Sleeping Turtle defense gives the Allies a one US PW cushion.
ISR: The JP used Central Agreement later in the turn to get Strategic Agreement (end ISR) allowing them to use East Force and their paratroopers twice this turn.
New Guinea: The JP opened with East Force using their paratroopers to capture the Vogelkop with an amphibious attack to secure Hollandia. Broadly the JP were consolidating their position in western New Guinea with the Allies securely holding the eastern end (Port Moresby, Lae, Gili-Gili). A later Allied offensive failed to retake Hollandia. Rangoon was not chosen as there was insufficient activations to take on a well defended Rangoon.
Central Pacific: The JP used a series of activations to shift their forces around to bolster the defenses of the Marshall Islands.
Remember, you are guaranteed to successfully amphibiously invade an island if you follow some simple math. Calculate how many hits a ground defense can generate on a two times combat result and divide by 6, for example a single step Japanese army can generate 18 hits divided by 6=3 potential offensive invasion step losses. Compare this to the number of defensive points the invasion has divided by 6 (for example two Marine divisions have 24 defense points divided by 6=4 invasion steps). If the invasion steps exceed the potential step losses, the invasion, unless repulsed by air/naval combat, will automatically succeed. The only unknown are the losses, but the island will be captured. Amphibious success/failure is not driven by luck in EotS, unless you fail to apply this math.
Darwin and the Darwin raid: Erasmus used its force buildup in Darwin to recapture Amboina to move its air umbrella (AZOI) over western New Guinea and the Celebes. This Erasmus force buildup caused me to launch a large air/naval raid to break up the force concentration in that location. It was broadly successful as it moved in forces that strengthened the area’s defenses at the cost of casualties due the Rochefort ambush event.
Solomon Islands: The Allies only needed one more recaptured hex to make PoW, but a successful reaction stopped the attack on Guadalcanal. Japanese carriers based at Eniwetok thwarted the invasion. This failed offensive used the last two available ASPs. The other ASP was used to capture Amboina.
New Guinea: This was a tough hand for the Allies as senior guidance was more focused on the CBI with insufficient forces relative to the South Pacific. This meant that the military events in some cases were used as OC, that prevented any smothering attacks. The end of turn offensive to recapture Hollandia initially failed, although it would not have impacted PoW as the port was not controlled by the Japanese at the beginning of the turn. Hollandia was taken on a second offensive. As stated earlier, turn 4 is when the Japanese will usually get their best opportunity to stop Allied PoW.
So, what is a ‘smothering attack’. In the classified USN amphibious planning manual it calls for attacks beyond an objective to ‘smother’ and isolate the objective from Japanese reaction forces. This is a standard tactic during the war and in Empire of the Sun. Military events allow for smothering attacks as you can create multiple battle hexes. Operation card plays cannot conduct smothering attacks as they can only create one battle hex. Hollandia was successfully defended due to a strong un-smothered Japanese reaction.
Bottom line: The successful JP perimeter defense resulted in the Allies failing their Progress of the War (hereafter PoW) requirement reducing US political will to 2 into what I euphemistically call the Tojo red zone. The Tojo red zone is where this event forces a negotiated JP victory. The War in Europe mechanic saw some back and forth events but ultimately remained in the -3 box. That said, the Allies have only lost one LRB to Europe so far (8th Air Force in England).
One strategy item that I mentioned earlier is the value of establishing a forward base (port) such as Guadalcanal by the end of turn 3. The value of Guadalcanal is 1 OC cards enable the easy capture of nearby islands. One of the implications of the Japanese Midway gambit is the IJN and the CFHQ are forward deployed making all Japanese reactions into the Solomon Islands available to counter short range 1 OC offensives as Guadalcanal is within Carrier range from Eniwetok.
Jan-April 1943 (T5)
Cards
| Japanese | Allies |
| Combined Fleet FoQ | Sextant FoQ |
| Op RE | Bataan |
| Kamikaze | China Off |
| Sho Go | WiE Major |
| ISR c7 | ISR c2 |
| WiE Minor | Coast Watchers |
| Gandhi Ind Party | Op Detachment |
| I Go | WiE Minor |
Reinforcements and Replacements enter play while Strategic Warfare once again fails (submarines missed) which is a lucky break for Japan. Both sides are drawing 7 cards, and each has one card in the FOQ.
Strategy: The Allies initially have a weak hand that lacks useful military events (Detachment) but will draw two new cards (Iceberg, Cherry Blossom). The big bonus is that Bataan should take the Allies out of the Tojo red zone.
The Japanese chose not to use Combined Fleet FOQ to go first, so as it’s 1943 the Allies now go first.
The Allies open with ISR (Japanese again in ISR) and draw Iceberg. Later in the turn the JP put the Allies into ISR and drew Tokyo Rose. An exchange of Bataan followed by Rose keeps US political will at 2. What this game will show is a good distribution of the PW cards.
ISR seems to shake new players to their core. Actually if you understand ISR, it will have little to no impact on play. During the war the Allies drove two mostly separate drives across the Pacific (MacArthur army/ Nimitz navy). If you segregate your forces and offensives into the historic axes of advance, ISR will be at worse slightly inconvenient. If on the other hand you have your US forces intermingled, ISR can limit what you can do when it is most inconvenient. There are a number of cards that have the MacArthur navy bonus and both services have the use of Australian forces through the ANZAC HQ but the main solution is to think service segregation, no special rule, and ISR will have minimal impact on operations.
On the Japanese side of the ledger ISR does limit use of reaction amphibious assault (hereafter AA) opportunities, whereby you send in a reinforcement that metaphorically got there just before the invasion. When under ISR the use of the five naval brigade units is an important anti-ISR tactic. Broadly, the Japanese should protect their brigades from needless attrition by pulling them back early in the game and putting them in reserve. This was done by me during turn 4 when I shifted army units into forward defense positions and pulled the South Seas Detachment (the 6-6 brigade) and the weaker SNLF brigades (4-6 brigades) into locations with organic transport. When the Japanese are in ISR, their best reaction in the Central Pacific is to use organic transport to shift the SoSa Brigade or two SNLF Brigades to oppose Allied invasions. They have sufficient strength to make a difference as long as the total strength is at least 6. Remember, while you can only use one ASP for reaction AA, there is no limit on organic transport.
For both sides, ISR has little to no impact in the CBI as it is primarily a Commonwealth and Japanese army theater of operations.
Central Pacific: The Allies manage to capture Guadalcanal, Rabaul, Kusaie, Tarawa, and Midway.
CBI: While the Japanese were being driven back in the Solomons and the Central Pacific they used their resources to grind out the capture of Burma and the loss of a US PW from 2 to 1. The game now hangs on a thread.
Bottom Line: Erasmus is performing well and gaining offensive momentum. I was able to capture the last remaining positions in Burma to cause its surrender. The game is close with no Tojo in sight.
May-Aug 1943 (T6)

Cards
| Japanese | Allies |
| Sho Go FoQ | WiE minor FoQ |
| Ants | Tornado TF |
| Kwai Bridge | Sub |
| Weather | Ash |
| JN25 | Black Day |
| 2nd Op Phase | Hump |
| Panama | Forager II |
| Pass | Typhoon |
Reinforcements and Replacements enter play while Strategic Warfare finally succeeds (submarines hit, -1 ASP and the loss of a card). The Allies draw 7 cards and one card in the FOQ. The JP are drawing 6 cards, one FOQ, with one pass.
Both sides are under ISR.
Strategy: The Japanese were extraordinarily lucky to lose their first card to Strategic warfare this late into 1943 sans the benefit of an Escort event. The Japanese beyond turn 2 should always try and bank a FOQ card as the US submarines usually perform better.
At this point Japanese strategy is entirely defensive while using a conservation of force doctrine. That said, you should always look for opportunities to wipe out an invasion as it reduces US political will by one. In this situation, that wins the game. Of course I will not let Erasmus fall into such a trap as I’m enjoying the game and a review of the ‘bot’s logic confirms it is programmed to avoid this situation.
Given that the Japanese are on the defensive I do not let myself get drawn into useless battles but rely on ground defenses to wear down the US ground units. It should be noted that the US does not have a ground force advantage per se and there are only so many Marine Divisions. So while ASPs are no longer a big impediment the Allies are not immune to ground losses.
Allied offensives: The Allies have a plethora of offensives that allow them to easily make PoW. The Allies will reconquer the Marshall Islands, Wake, and Marcus. The capture of Marcus puts LRB air units within range of many Japanese naval ports to include Tokyo.
The Japanese used their weather card to neutralize Typhoon followed by Panama to re-establish their card count. The various draw cards gave the Japanese another ISR card (card 11) and another weather card. The issue with weather cards is they do not draw a replacement card.
Europe: The Allies begin to make some progress in Europe lowering the -3 to the -2 box.
Bottom line: A typical mid game turn where the Allied steamroller begins to gather momentum. The one fly in the ointment is US PW sits at one leaving no room for error.
Sep-Dec 1943 (T7)
Cards
| Japanese | Allies |
| 2nd Op Phase FOQ | Heroic Repair FOQ |
| U Go | Doolittle |
| Flight Instructors | New Sub Doctrine |
| ISR c34 | X Craft |
| Kolombangara | Skip Bombing |
| Sub | Halsey HQ |
| Sub | Roosevelt end ISR |
| Pass | Chronicle |
Beyond the usual reinforcement procedures, the Allied submarines hit again.
Strategy: Japanese strategy this turn is identical to the last turn. Prevent the Allies from gaining US PW by reconquering an Allied possession such as the Philippines. Once Strategic bombing begins all the Japanese can do is hold on for a pyrrhic victory. This is a strong Japanese reaction hand for this point in the war as it has three draw cards, air replacements and a pass; which should allow the Japanese to go last.
Erasmus is wound up and is beginning to focus on getting a B29 base (Saipan). When I play against Erasmus it is really a man in the mirror situation for me.
What happened? The Allies used Roosevelt to end ISR and gained new cards from X Craft (used as a discard for Tornado TF) and New Submarine Doctrine. More importantly the Allies are holding Doolittle. But then fate intervened as the Japanese were able to draw 3 cards (maximum allowed) and on the last draw they top drew TOJO. Due to the Pass, the JP early in the turn were assured to go last and regardless of how you play it, Doolittle is too little too late. On the last card play, TOJO knocked US PW to zero and a negotiated end to the war; Japan wins.
Final Thoughts: it ended with a political whimper
If I were a betting man at the beginning of game turn seven I would have put my money on the Allies (Erasmus ‘bot) clawing their way back into the game, especially after placing Doolittle in a game turn 8 FOQ. Having Doolittle in the FOQ is an offset to any future appearance of TOJO. With Doolittle in the Allied FOQ plus going last ensures that the Japanese will not get a negotiated settlement win because TOJO cannot push US PW below zero. If these cards were played in the opposite order the Allies survive to fight the rest of the war. My surprise was the Allies in 1943 usually go last due to card count but this time the Japanese were guaranteed to go last when Tojo appeared.
This narrative of the war saw a newly installed President Henry A. Wallace’s commitment to unconditional surrender shake after the Soviet economy collapsed in 1943 (WiE at -2). In this telling of the conflict an alert and aggressive Hirohito stares down the military, fires Tojo then opens up serious negotiations through Chiang Kai Shek to end their conflict. The terms of this negotiated settlement could have seen Hirohito agreeing to withdraw from all conquered territories to include China with other major concessions to avoid Allied occupation of Japan. Clearly historical fantasy yet everything in World War II was connected and if the Soviet Union’s economy had collapsed (see Parshall’s 1942: Crux of War) Wallace and Churchill may have looked at the German threat differently. Remember all wargames are alternate history.
Regardless, this session turned on the Japanese using the Midway gambit to reduce US PW by two for US carrier elimination and the loss of Midway. While luck is always a factor in these tight situations, each side got one of their four PW cards on the same turn, so it wasn’t really card luck as one more US PW might have forced the game into an Allied invasion of Japan end game. Well there you have it, I hope you enjoyed the narrative and strategy dialog.
Mark Herman
Westchester New York
September 26, 2026
